ProofPoint Spam Quarantine helps protect employee email by scanning it for spam, viruses, and other harmful content.
See our Frequently Asked Questions (FAQs) below for ProofPoint.
Can't find what you're looking for here?
Need help?
-
If you need help from a technician, please contact the
ITS Help Desk.
Table of Contents
Introduction
About ProofPoint Spam Quarantine
Our
Proofpoint Spam Quarantine helps protect your employee email by scanning it for spam, viruses, and other harmful content.
This system not only detects viruses and threats but also aims to reduce the number of ads and third-party marketing emails landing in your inbox.
Starting from 06/21/23, you will receive a daily email containing a link to your email digest. This digest will contain messages that are suspected to be spam or classified as 'bulk mail'. The way you handle these messages will dictate how future messages from the same senders are processed.
Proofpoint Spam Quarantine Guide for RSCCD Employees
Select the link here to view the
Proofpoint Spam Quarantine Guide for RSCCD Employees.
This guide explains how to manage and release messages from your personal Spam Quarantine, using the daily End User Digest emails and the End User Web Application.
It also explains how to manage your own lists of personal lists of Safe Senders and Blocked Senders, which gives you control of what gets filtered as spam. If you need help, please
contact the ITS Help Desk.
Please note this guide is intended for faculty and staff at RSCCD (Rancho Santiago Community College School District), and is not applicable for student email accounts.
FAQs about Missing Emails
I didn't receive email I was expecting. What should I do?
Check ProofPoint End User Digest
-
Look for the missing email in the daily
End User Digest email sent to your inbox.
-
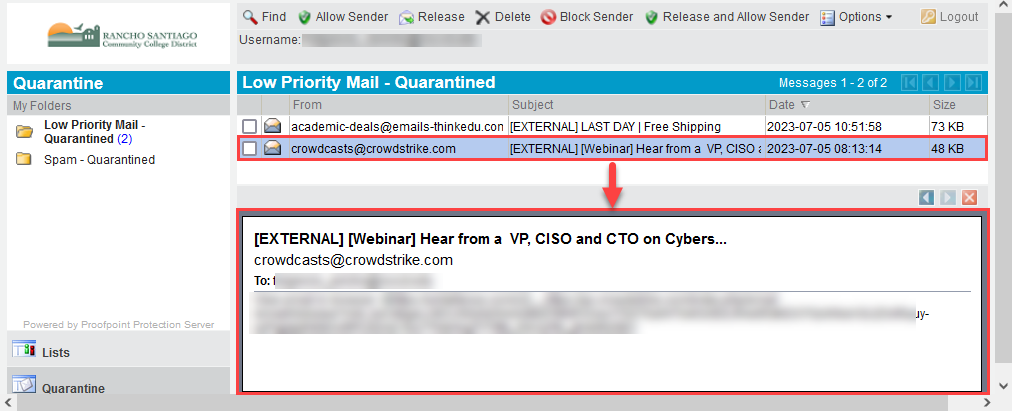
Check the
End User Web Application for quarantined messages. Here's the direct link to access the End User Web App:
https://0031c602.pphosted.com:10020/euweb/login
-
On the left navigation of the End User Web App, there are two folders for
"Low Priority Mail - Quarantined" and
"Spam - Quarantined". Check both of these to see if you can find the emails there.
Check Junk Email folder in Outlook
Check your
Junk Email folder in Outlook. The email might have been marked as junk or spam by Microsoft Office365.
Follow the directions below to flag the email as "not junk" in Outlook:
-
Open Outlook desktop app, or login to Outlook Web Access at
https://outlook.office.com
- On the left navigation,
select the
Junk Email folder
-
Find the message that was incorrectly marked as junk.
-
Right-click the message, and select Junk > “Not junk” or select Report > “Not junk”
-
In the “Report not junk” dialog box, select OK.
Check Deleted Items folder in Outlook
Check your
Deleted Items folder in Outlook. It's possible the email may have been filtered into Deleted Items, or the message was flagged as "Ignored".
Follow the directions below to restore Deleted Items from the mailbox:
- Open Outlook desktop app, or login to Outlook Web Access at
https://outlook.office.com
- On the left navigation,
select the
Deleted Items
folder.
- Find the message that was incorrectly sent to the Deleted Items folder.
- Right-click the message, and select
Move > Inbox.
- Alternatively, if the message was set to be
Ignored:
-
Right-click the message and select "Ignore" to bring up the
"Stop Ignoring Conversation" dialog box.
- When asked "Do you want to stop ignoring this conversation and move it to the Inbox folder?",
select "Stop Ignoring Conversation."
- Check the Inbox to see if the message was restored.
Check Mailbox Rules in Outlook
In the case of both Junk email and Deleted Items, it's possible an email rule is filtering your emails into these folders after they are delivered to your mailbox.
To check and manage email rules in Outlook on the web (outlook.office.com), follow these steps:
- Open a web browser and go to
Outlook Web access at
https://outlook.office.com
- Sign in to your account.
- In the top right corner of the page,
click on the "Settings" gear icon.
- At the bottom of the "Settings" pane, click on
"View all Outlook settings".
- In the "Settings" window that opens,
select "Mail" from the menu on the left.
- Click on
"Rules".
- You should now see a list of all your existing email rules.
- From this page, you can add new rules, edit existing rules, or delete rules.
Check Outlook Web Access (OWA) at https://outlook.office.com
As an alternative to checking the Outlook desktop app, you can go to
https://outlook.office.com and login with your Single sign-on username and password to check emails from
Outlook Web Access (OWA). OWA is the method for accessing your employee email through a web browser.
Once logged into OWA, use the search bar at the top of the page to query the mailbox. By default, the search context will be set to "All Folders." You can change the context by selecting the dropdown list and selecting a specific folder to search, such as the Inbox.
If you can find the missing email on OWA, but not on the Outlook desktop app, it's likely the Outlook desktop app is not updating correctly, or has filtered out your email due to a mailbox rule.
Optional: Turn off Focus Mode in Outlook
The "Focused Inbox" in Outlook separates your inbox into two tabs—Focused and Other. This can cause issues with not being to find emails as expected.
If you've taken all these steps and are still unable to locate the email, please
contact the ITS Help Desk for assistance.
How can I make sure future emails don't go to my End User Digest and come to my inbox instead?
- Look for the daily
End User Digest email in your inbox.
- Find the message that was quarantined in the End User Digest, then select the
"Release and Allow Sender" button.
- This will release the email to your inbox, and adds the sender's email address to your
personal Safe Senders list.
- From now on, future emails from this sender will go to your Inbox instead of being filtered by the spam Quarantine.
How do I preview the contents of a quarantined email to see if it might be legitimate?
Here's how to preview the contents of a quarantined email in the End User Web App:
- Login to the End User Web App. Here's the direct link to access it:
https://0031c602.pphosted.com:10020/euweb/login
- In the End User Web App, find the quarantined email and select it.
- A preview pane will appear on the bottom, showing the content of the email in plain text. You can use this to help evaluate if the email might be legitimate.
FAQs for Daily End User Digest Emails
What is an End User Digest email?
When spam messages are identified by Proofpoint, they are sent to your personal Spam quarantine for review.
An email notification with the subject line
“End User Digest” will be sent to your Inbox from noreply-proofpoint@rsccd.edu to let you know that you have messages waiting in your Spam Quarantine.
The End User Digest email is sent to your inbox daily, once a day.
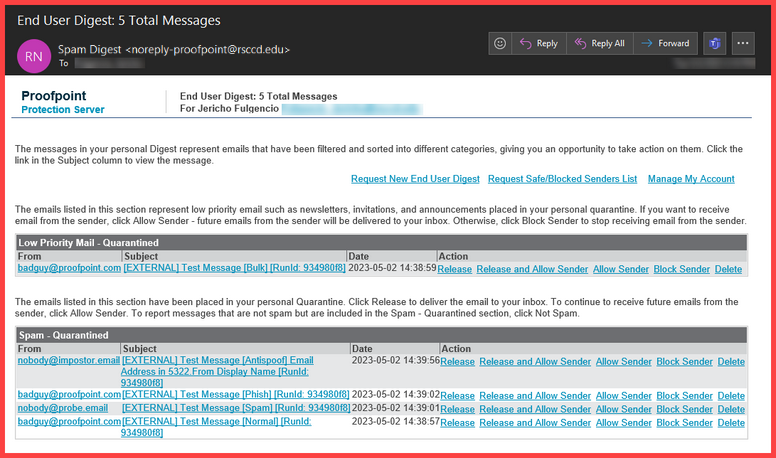
What is inside an End User Digest email?
The End User Digest email displays all your quarantined messages in a list for the past 45 days.
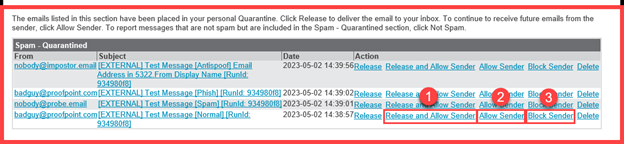
The list shows information about who sent the email (“From”), the email subject (“Subject”), the date it was sent (“Date”), and an action to be taken (“Action”). You can take the following actions with a quarantined email:
-
Release: Releases the email to your inbox.
-
Release and Allow Sender: Releases the email to your inbox and adds the sender’s email address to your personal Safe Senders List.
-
Allow Sender: Adds the sender's email address to your personal Safe Senders list.
-
Block Sender: Blocks the email and adds the sender’s email address to your personal Blocked Sender’s list.
-
Delete: Deletes the email from the Quarantine.
What happens to Spam messages in the Quarantine if no action is taken?
The End User Digest shows you messages that have been stored in your Quarantine for
45 days.
After 45 days, messages will be automatically deleted from your Quarantine.
How do I deliver a New Email Digest to my Inbox?
From an existing End User Digest email
To see the most recent messages in your Quarantine, click "Request New End User Digest" in one of your existing End User Digest emails.

A new webpage will open for Request New End User Digest displaying the Rancho Santiago logo, with a header that reads
Command processed successfully and a confirmation message that reads
“Generated digest for recipient: <your email address>.”
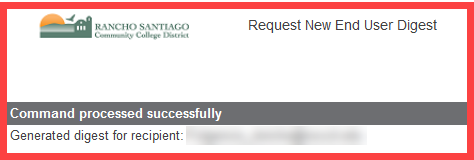
From here, check your inbox again for a new End User Digest email.
From the End User Web Application
You can also go directly to the End User Web Application website here:
https://0031c602.pphosted.com:10020/euweb/login
From the web portal, select
"Options" on the menu at the top of the page, then
"Request Digest". This will manually send a new digest email to your mailbox.

FAQs on Safe Senders & Blocked Sender
What are Safe Senders & Blocked Senders?
You can make two lists to manage your email:
- Your
Safe Senders list is for approved senders that won't be checked for spam (but still for viruses).
- Your Blocked Senders list is for people or mailing lists you don't want to receive emails from.
How do I add to the Safe Sender or Blocked Sender lists?
From the End User Digest email:
- Click
"Release and Allow Sender" to release an email to your mailbox and make an email address safe.
- Click
“Allow Sender” to add an email address to your Safe Senders list.
- Click "Block Sender" to block an email address.
How do I view and manage the Safe Senders & Blocked Senders Lists?
To view your lists, click
"Request Safe/Blocked Senders" in the End User Digest email.
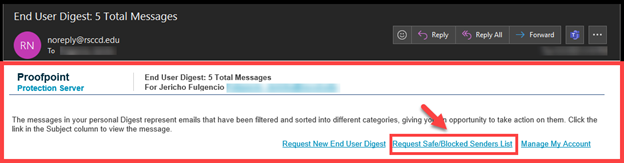
To edit them, click
"Manage My Account" in the Digest, which opens a web browser to the End User Web Application.
What tips do you have for managing these lists?
- Be careful when adding domain names to your Safe Senders list.
- Instead, add specific email addresses to ensure only approved senders get through.
- When you add a domain name (e.g., yahoo.com) to the Safe Senders list, all email addresses from that domain will be considered “safe.”
- You should restrict the safe list to specific senders by entering their full email addresses (e.g., john.doe@yahoo.com).
FAQs on End User Web Application
How do I access the End User Web Application?
The direct website address for the End User Web Application is:
https://0031c602.pphosted.com:10020/euweb/login
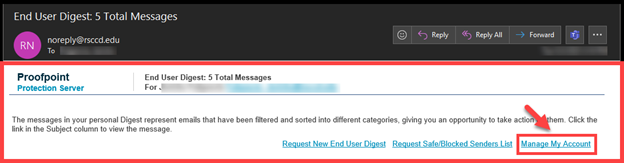
You can also find this link by opening an End User Digest email, by clicking
"Manage My Account" in the email Digest. This will open the End User Web Application in a browser.
How do I manage my spam Quarantine from the End User Web Application?
To view your personal Spam quarantine, select
Quarantine > My Folders > Spam – Quarantine folder in the left pane.
From the
Quarantine folder, use the checkboxes to select the emails you want to take action on.
Below is the list of actions you can take:
- Use the
Allow Sender button to get a message in your Inbox and allow future messages from that sender to be delivered to your Inbox.
- Use the
Release button to get a message in your Inbox.
- Use the
Block Sender button to delete the message and block future messages from that sender.
- Use the
Release and Allow Sender button to release an email to your mailbox and make an email address safe.
- Use the
Delete button to remove the message from the spam quarantine.
- Note that spam messages will be deleted automatically after
45 days.
How do I manage my Safe Senders and Blocked Senders lists from the End User Web Application?
To add senders to your Safe Senders or Blocked Senders, click "Lists" in the left pane.
Under
My Lists, select from the
Safe Senders List or
Blocked Senders List.
From here you can:
- Add
New email addresses.
-
Edit email addresses.
-
Delete email addresses from the list.
What other options are available in the End User Web Application?
The Options menu in the menu bar lets you:
- Request Digest, which sends a new End User Digest email to your inbox,
- Refresh the right pane (useful after deleting all messages).
- Delete All currently-displayed messages from your Quarantine.
- Note that spam messages will be deleted automatically after
45 days.
Troubleshooting problems
Who do I contact for help?
Faculty and Staff may contact the ITS Help Desk
ITS Help Desk.
(You've reached the end of the page. Select this link to return to the top of the page.)